Wednesday, March 30, 2011

Kiwi Strawberry Punch

My experiments with Kiwi still continue :-). Also this was my first time blending strawberries without milk. Fruity goodness for juice/mocktail lovers!

Serves 2
Preparation Time: 10 Minute
Cooking Time: NIL

Ingredients
1 medium kiwi
4-5 strawberries
1 tsp sugar
1 cup plain carbonated/seltzer water
2 scoops any strawberry flavored ice cream

Procedure
1. Blend kiwi and berries with sugar and little water until smooth and pour it in serving glass
2. When ready to serve, add seltzer water and top it with ice cream


Tuesday, March 29, 2011

Garlic Bread

I had garlic breads/ bread sticks first time at Pizza Hut in my college days. But I became a real fan during my stay in Mumbai. We would frequently order lunch from Domino’s and I would be more interested in bread sticks than pizza! Here, I have tried frozen ones. They are fine once in a while when you want them at the eleventh hour, but if it is planned dish, I would always prefer making them home.

Italian or Baguette type of bread loaf can be used to make Garlic Bread. Ideally, bread should be sliced towards bottom, but still kept in one piece. Then olive oil/butter/garlic should be spread between the slice and whole bread should be baked. Once thoroughly baked inside and crispy outside, it should be cut into slices. This method keeps the bread crispy yet soft and moist at the same time. Another approach is to cut bread into slices first. Top individual slice with butter/oil/garlic and then bake them. This is simpler, easier and faster. As I need my bread real crispy, I go for this second approach.

Makes 12 garlic breads
Preparation Time: 10 Minute
Cooking Time: 20 Minute

Ingredients
1 LB Italian bread loaf
4 tbsp butter
4 tbsp olive oil
½ tsp red chili flakes **
½ tsp basil leaves **
½ cup parmesan cheese (Optional)
Salt and pepper
** basil and chili flakes can also be replaced by fresh parsley

Procedure
1. Cut bread loaf into ½” thick slices
2. Heat butter and olive oil in a skillet on low flame and add minced garlic
3. Stir in between, garlic should be cooked and not burnt
4. Add salt and pepper and turn off the heat when garlic turns light pink
5. Apply this mixture generously on both sides of the slice. Sprinkle them with basil, red pepper and cheese
6. Bake at 350 F for about 10 minutes on either sides o until cheese is melted and bread is crispy


Sunday, March 27, 2011

Kiwi Crush

Summer is almost hanging upon us and I am eagerly looking forward to cool summer drinks. Recently I bought kiwis for the first time (!) and now I am regretting why I did not try them earlier. Anyway, after tasting it I figured out that it would taste better in form of juice/mocktail than having just by itself.

Serves 2
Preparation Time: 5 Minute
Cooking Time: NIL

Ingredients
A kiwi
A ripe banana
1 tsp sugar (optional)

Procedure
1. Blend kiwi and banana together with little water. Add sugar if required
2. Fill quarter of a glass with crushed ice and pour over kiwi-banana juice


Saturday, March 26, 2011

Spinach Pasta w/ Roasted Red Pepper

Pasta without marinara sauce can taste just perfect, sometimes even better! Though I had planned to use only white sauce, I wanted my pasta colorful. So I added spinach pulp to sauce to offer green base and then added roasted red pepper. I was surprised to find out how a little change can bring a big difference, I am glad that now I know one more pasta variety. I had used just regular white sauce with little cheese, but if you are not carefully watching your weight, go for alfredo sauce :)

Serves 3-4
Preparation Time: 10 Minute
Cooking Time: 40 Minute

Ingredients
3 cup pasta (I used penne)
2 cup spinach pulp (Blend raw spinach with little water)
½ cup parmesan cheese
2-3 cloves of garlic
A large red pepper
Salt and pepper

Procedure
1. Roast red pepper in oven or on gas, take off the skin and cut it into small pieces
2. Boil pasta and keep it aside
3. Prepare white sauce, add minced garlic, ¼ cup parmesan cheese and spinach pulp
4. In a large oven safe bowl/tray, mix white sauce mixture, roasted red pepper and pasta
5. Top it with remaining ¼ cup cheese and black pepper
6. Bake it at 350 F for about 20 minute or until cheese starts bubbling
7. Serve hot with your favorite side – soup, salad, mashed potato or garlic bread

Friday, March 25, 2011

Hara Bhara Kabab

This kind of kabab has become quite common at restaurants and parties as an appetizer. For vegetarian version, use potatoes as base, then add veggies of your choice and mix bread crumbs/corn starch for binding and fry/grill, kabab is ready. I use different veggies ranging from carrot, onion, spinach, corn, pepper and peas and it tastes amazingly different if you just change type and quantity of these veggies. This time I wanted restaurant style ‘Hara Bhara Kabab’ so I used only spinach and peas. I stuffed them with cashew nuts and cheese to give a little ‘Royal’ touch :-)

Makes 16 kababs
Preparation Time: 15 Minute
Cooking Time: 30 Minute

Ingredients
3 medium potatoes (Should yield about 2 cup mashed potatoes)
½ cup peas
2 big handfuls of spinach (1 cup after boiled and chopped)
½ tsp cumin powder
1 tsp lemon juice
¼ tsp garam masala
¼ tsp clove-cinnamon powder
1 tsp green chili paste
3 tbsp corn flour
8-10 cashew nuts (optional)
3 tbsp shredded cheddar cheese (optional)
Salt
Oil for frying

Procedure
1. Boil and mash potatoes, keep it aside.
2. Heat water in a large pot, when starts boiling add spinach. Cook it covered for couple of minutes, then drain into colander and place it under cold running water to stop the cooking process. When it cools down, squeeze thoroughly to remove water (I used muslin cloth), chop and add to mashed potato.
3. Chop peas using chili cutter or chopper and add to potatoes.
4. Add all spices, corn flour and mix well.
5. Divide mixture into equal size balls. Now take a ball in your palm, flatten and stuff it with cashew nuts and cheese.
6. Heat oil in skillet and shallow/deep fry these kakabs on both sides until golden brown and crispy. If they fall apart while frying, add some more corn flour.
7. Serve hot with chutney.


Thursday, March 24, 2011

"Salad" Sandwich

Another variety of sandwich with lots of salads! I had plenty of veggies suitable for salad and I also wanted to use the bread. At the same time I did not want to put much efforts and I am happy that this last minute fix turned out indeed delicious. I am sure people who raise brows at salad will happily have this sandwich. It’s healthy (especially if brown bread is used), tasty, fast and easy to prepare, can life can get any better? ;-)

Yields 6 sandwiches
Preparation Time: 20 Minute
Cooking Time: NIL

Ingredients
Veggies of your choice cut into small pieces
¼ cup beet, boiled
¼ cup cucumber
½ cup potato, boiled
¼ cup red and green pepper

1 medium tomato, cut into slices
1/4 cup onion, thinly sliced
2 tsp thousand island salad dressing
Salt and pepper
Bread slice, though sandwich roll is preferred
Butter spread
Cheese slice or shredded cheese (Optional)

Procedure
1. In a large bowl mix all veggies. Add salad dressing and mix well
2. When ready to serve add salt and pepper
3. Now take a slice of bread, spread butter, tomato slice, veggies, onions, cheese and cover with another slice

This is a good cold sandwich for pot lucks and picnics


Preserve strawberries

We both love strawberries with cool whip and in a milk shake almost round the year. But during cold days they are not easily available. Even if they are, they are not as sweet as they are in summer and also quite expensive. So usually, at end of the summer I’ll buy them in bulk and freeze them for winter. I have tried different methods to preserve them but the one described below suits me the best.

Procedure
1. Cut the tops off and thoroughly clean them
2. Gently pat dry them with clean towel and arrange them in a plate upside down (So flat surface is at bottom) such a way so they do not touch each other
3. Keep this plate in freezer uncovered for 2-4 hours so berries become hard and easy to handle
4. Now store them in a tight container or a zip loc bag in a single layer

They remain good for at least 2-3 months

Wednesday, March 23, 2011

Sev Usal

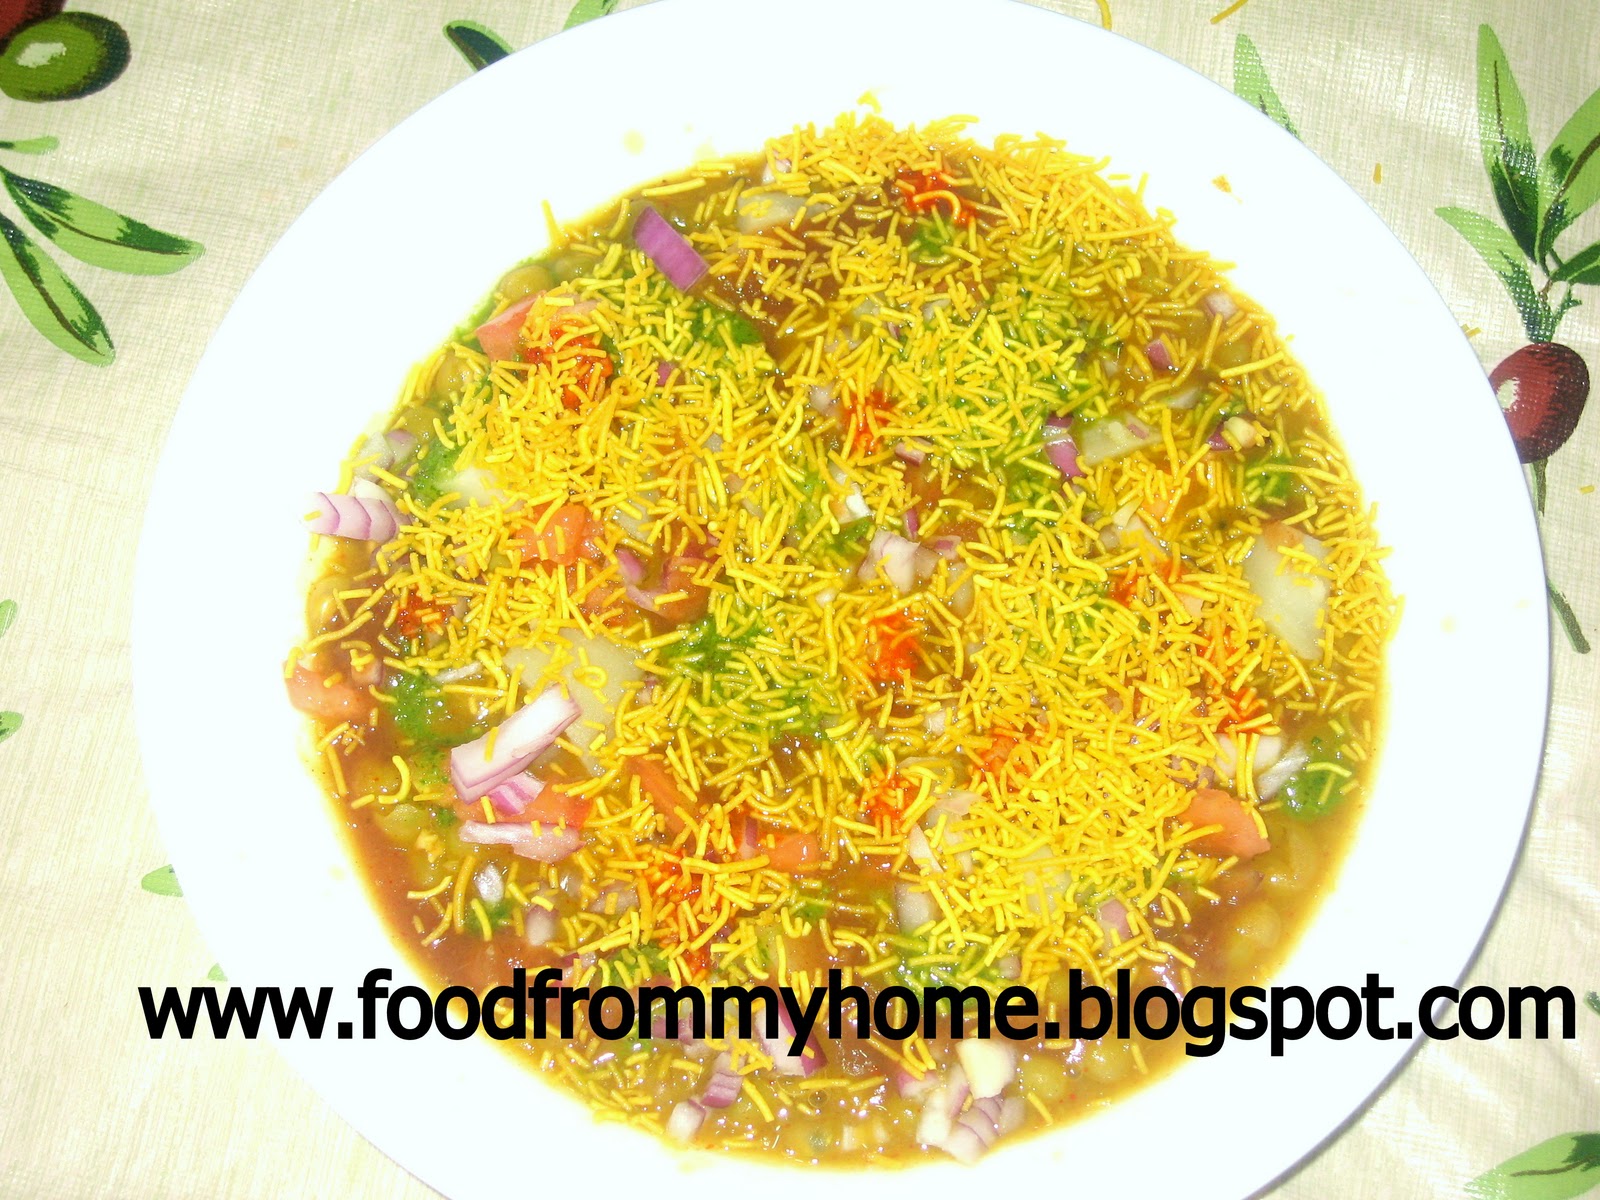
If you are craving for something spicy and not in a mood to spend much time, you might want to make this dish. It’s spicy yet requires very less oil and if chutneys are prepared, this dish can be fixed in a jiff. Usal is originally from Maharashtra, but it's quite popular in over all West India. The fact I love the most about this dish is that it makes a complete meal by itself.

Serves 4-6
Preparation Time: 15 Minute + soaking time
Cooking Time: 20 Minute

Ingredients
To make usal,
3 cup dry peas (Fresh ones taste better, use 4.5 cup)
1 tsp oil
A bay leaf
½ tsp mustard seeds
½ tsp cumin seeds
8-10 curry leaves
½ cup chopped tomatoes
½ tsp turmeric powder
½ tsp red chili powder
½ tsp dhaniya powder
½ tsp garam masala
½ tsp ginger paste
1 tsp green chili paste
½ tsp pav bhaji masala
1 tbsp jaggery
2-3 dried whole mango piece/ 2 tsp aamchur

To serve usal,
1 cup potato, boiled and diced
½ cup diced tomatoes
1 cup finely chopped onions
Tamarind Chutney per taste
Garlic Chutney per taste
Green Chutney per taste
2 cup Sev

Procedure
1. Soak peas in warm water for 6-8 hours and pressure cook with salt. Make sure not to overcook them
2. Add jaggery and dried mango piece and bring it to boil on low flame
3. In a separate skillet, heat oil. Add bay leaf, mustard seeds, cumin seeds, curry leaves and chopped tomatoes
4. Stir for a while, add chili-ginger paste and remaining spices, mix well
5. Once this mixture starts leaving oil on edges, add it to boiling peas
6. Add more salt and water if required and turn off the heat once all spices are nicely absorbed (About 5-10 minutes). Usal tends to get thick once you turn off the heat, hence add extra water while boiling


How to Serve
1. Pour hot usal in a bowl. Add all three chutneys, potato and tomato, mix well
2. Add chopped onions and sev, consume immediately before sev becomes soggy


Thursday, March 17, 2011

Sev/ સેવ

During my teenage days, I was never much into spending time in the kitchen let alone cooking. But there were certain dishes which I would want homemade with particular taste. And this snack is one among them. However hard I tried, I could never develop taste bud for store bought pack. Before I started learning cooking even regular simple menu, I had made up my mind that I had to know how to prepare this one. It asks for few simple ingredients, but I could never make proper dough in one shot. It was always trial and error process and I got more irritated with mess created after such trial and error than the actual making process. Anyway, today I started very patiently and in the vey fist attempt, I had it right!!

Makes about 2 LB (About 14-15 batches)
Preparation Time: 15 Minute
Cooking Time: 30 minute

Ingredients
3 and ¼ cup gram flour/besan
3 tbsp oil
¼ tsp asafetida
½ tsp red chili powder
1 tsp white chili powder
¼ tsp black salt
Salt
Oil for frying

Procedure
1. In a large bowl mix oil and ¾ cup water and whisk thoroughly
2. Add all dry spices and mix well
3. Now add flour and blend completely
4. Now brush oil inside the machine and close the lead tightly
5. Heat oil in frying pan and deep fry Sev on medium-high flame until light pink and crispy
6. Once cool down store in a tight container


Tomato Carrot Soup

Good food does not have to be fancy or complicated to prepare and this soup is the best example. With appetizer or main course, this delicious soup can be prepared in a jiff.

Serves 4
Preparation Time: 5 Minute
Cooking Time: 20 Minute + cooling time

Ingredients
5-6 large tomatoes
2 medium carrots
1 tsp butter
½ tsp minced garlic
¼ tsp sugar
¼ tsp clove-cinnamon powder
Salt and pepper
Cheddar cheese (Optional)

Procedure
1. Peel and cut carrots into small cubes. Boil whole tomatoes and cut carrots until carrot is soft
2. Once they cool down, peel off tomato skin (If skin is tender, I prefer to retain it) and liquefy the mixture using electric blender
3. Now in a separate skillet, heat butter, add garlic and pour it over to carrot-tomato mixture
4. Add salt, sugar and clove-cinnamon powder and bring it to boil
5. Turn off the heat. Add black pepper and cheese, serve hot


Salad Crackers II

Be it brunch, evening snack or a side dish, I have always loved these little bites. I have experimented with different types of crackers and literally bizarre toppings, but not all of them are worth putting on the blog ;). Lately I made them as an appetizer with full course dinner and both of us were so hungry that none of us has patience or energy to take a picture!! So photo will be uploaded sometime soon (when I’ll make them again), but till then enjoy the recipe.

Makes 20 crackers
Preparation Time: 10 Minute
Cooking Time: NIL

Ingredients
1 cup finely chopped salad veggies of your choice (I used tomato, onion, scallion, red pepper, jalapeno and zucchini)
1 tbsp pasta sauce
1 tbsp parmesan cheese
20 pc topping crackers
Salt and pepper

Procedure
1. Finely chop all veggies, add pasta sauce, cheese, salt and pepper
2. Top crackers with this mixture and serve immediately

Monday, March 14, 2011

Mutter-Paneer

Here I am with restaurant style recipe of Mutter-Paneer. As my curry masala was ready, this was very easy and quick.

Serves 4
Preparation Time: 10 Minute + time to prepare paneer
Cooking Time: 20 Minute

Ingredients
1 cup green peas
1 cup paneer cubes
3 cup sliced onions *
2 tbsp Punjabi masala
1 cup tomato sauce
2 tsp oil
1 tsp chili paste
1 tsp ginger paste
½ tsp garlic paste
1 tsp red chili powder
1 tsp dhaniya powder
¼ cup cream **
Salt
Coriander leaves for garnishing
Oil to sauté onions and fry paneer

*quantity of onion = 1.5 to 2 times than veggies (When using onion paste)
** If you do not have heavy cream, regular milk or even yogurt can be used

Procedure
1. Sauté sliced onions in little oil on low flame until light brown. Once cool down, grind it into a smooth paste
2. Fry paneer on low flame until light pink/brown
3. Now heat oil in a skillet. Add garlic paste, chili and ginger paste. Fry for a while and add curry masala
4. Roast masala on low flame until it starts leaving oil on the edge
5. Add onion paste, tomato sauce, salt, chili powder and dhaniya powder
6. Add peas and paneer and let this mixture bring to boil, stirring occasionally Add water if required)
7. Add cream, immediately turn off the heat and garnish with coriander leaves


Punjabi Curry Masala

Till now I never knew that Punjabi curry requires so many different spices. I was given this recipe with about 25 ingredients listed to make this masala. This can be made in advance in bulk and preserved for couple of months. If this is ready, you hardly need any other spices and making restaurant like Punjabi curry is a job of minutes. I did not have all the spices to make this masala (And they are not available here too) and some of the spices were available in limited quantity. Still I thought to give it a shot and my first experiment with this masala (Mutter Paneer) was a big hit for weekend dinner.

Yields about ¾ cup
Preparation Time: 10 Minute
Cooking Time: NIL

Ingredients
20 pc cashew nuts
1 tbsp મગત્સરીના બી
1 tsp poppy seeds
15 pc almonds
1.5 tsp black pepper
15 pc cloves
1” cinnamon stick
2 tsp fennel seeds
8-10 strands of saffron
1 tsp coriander seeds
5 pc cardamom
2 tsp cumin seeds
2-3 pc bay leaves
1-2 pc whole red chilies
2 pc big cardamom/એલચા
8-10 pc nagkesar/નાગ કેસર
1 tsp jaavitri/જાવન્ત્રી
3-4 pc star anise/Badalfool/બાન્ધીયા
1 tsp black cumin seeds/શાહી જીરુ
1 tbsp dagadfool/દગળફૂલ


Procedure
1. Mix above all spices and grind into a fine powder
2. Refrigerate in air tight container

Wednesday, March 9, 2011

Pineapple Cheese Macaroni

This kind of macaroni and cheese became quite popular in party menus as a side dish along with Punjabi Curries and Naan. Ironically most of the places would serve it without cheese!! And mostly it would taste literally sweet. Another version also became quite popular called Pineapple Cheese Macaroni, where pineapple chunks will be added along with pasta/macaroni. This is served so frequently as a part of Punjabi menu that I am not sure whether this should be considered from Italian Cuisine!! When I made this dish for the first time I made a big blunder by using fresh pineapple. It literally tasted bitter. Ideally canned pineapple should be used and that too preserved in pineapple syrup as opposed to sugar syrup.

Serves 2
Preparation Time: 10 Minute
Cooking/Baking Time: 45 Minute

Ingredients
1 cup pasta (I prefer shell or ziti)
1 cup pineapple cubes
2 cup white sauce
¼ cup parmesan cheese
Salt and pepper

Procedure
1. Boil pasta and keep it aside
2. Prepare white sauce
3. In a baking tray make alternate layers of sauce, pasta and pineapple while sauce is still hot
4. Sprinkle cheese, salt and pepper
5. Cover the tray with aluminum foil and bake it at 350 F for about 20 minute or until sauce starts bubbling
6. Remove the foil and broil it for 5-7 minute until cheese form crispy light brown layer


Thursday, March 3, 2011

Veg Spring Roll

Though I am not a big fan of Chinese food, I have always loved spring rolls. I started making them after I came to US. That time I was not aware about readymade spring roll sheets. So I would make a dough using plain flour and roll it into a thin sheet. It would taste good, but still it was not a neat job, rolls would not be tight and crispy as they should be. Soon I found these square sheets in Indian grocery store. I again tried with these sheets, at least one problem was solved that spring rolls came out crispy. But they still did not have a nice look and feel and sometimes they would fall apart while frying. Then I came across a video on YouTube that showed how to roll them. And this time it came out unbelievably perfect. Ideally spring roll should have sprouts and noodles but this was my last minute decision that I worked only with veggies.

Makes 12 rolls
Preparation Time: 20 Minute
Cooking Time: 20 Minute + cooling time

Ingredients
Finely chopped/shredded veggies,
2-3 cloves of garlic
¼ cup cabbage
½ cup carrots
¼ cup green pepper
¼ cup onion
½ cup green beans
2 tbsp scallion

12 pc spring roll sheets
1 tsp olive oil
1 tsp green chili sauce
1 tsp soy sauce
½ tsp vinegar
¼ tsp sugar
Salt and pepper
Oil for frying

Procedure
1. Heat olive oil in skillet. Add chopped garlic and onion
2. When onions are slightly cooked, add remaining veggies except scallions and mix well
3. Add salt, chili sauce, vinegar, soy sauce and sugar
4. Let this mixture cook on low flame uncovered and stir in between. It is not required to cook veggies thoroughly
5. When mixture becomes dry (about 15 minutes), turn off the heat and add scallion and black pepper. Let it cool down completely at room temperature
6. Defrost spring roll sheets as per instruction and keep them covered in moist towel
7. Now as shown in the picture, place a sheet diagonally, apply flour paste on all four sides (flour paste = whole wheat flour + water) and place stuff such a way so it does not touch the edges


8. Tightly roll the sheet and apply some more flour paste if required to seal the roll thoroughly
9. Do not let them sit for a long time and fry them immediately on both sides on low flame
10. Serve hot and with soy sauce, if desired


Wednesday, March 2, 2011

Methi Poori

Here I am with another tea time snacks recipe. These crispy little bites with a hint of bitter taste are just irresistible. I made them using fresh methi but alternatively kasoori methi can also be used.

Makes 40-45 Pooris
Preparation Time: 45 Minute
Cooking Time: 30 Minute

Ingredients
1.5 cup whole wheat flour
1/4 cup gram flour
1/3 cup plain flour
1.5 cup fresh methi leaves (Use ¾ cup if using kasoori methi)
1 tsp oil
1 tsp turmeric powder
1 tsp red chili powder
½ tsp ajwain, coarsely crushed
½ tsp cumin seeds, coarsely crushed
Salt
Oil for deep frying

Procedure
1. In a large bowl, mix all three flours, salt and sieve with oil
2. Mix remaining spices and methi leaves and knead hard dough
3. If you are using fresh methi, dough tends to soften down. So roll poors right away
4. Let pooris dry down uncovered at room temperature for couple of hours
5. Heat oil in a pan, gently prick pooris with fork and deep fry them on both sides until golden brown
6. Once cool down, store them in a tight container. They stay good for at least 4-5 weeks


Tuesday, March 1, 2011

Vada - Pav

I became Vada-Pav fan in my college days. College cafeteria served a delicious Vada-pav just for five bucks. They also had a royal version of it called Cheese Vada – Pav. Then a friend of mine introduced me to a few famous Vada-Pav joints in Ahemdabad. Later when I started working in Mumbai, it became a part of everyday food. Office cafeteria would serve it almost every Friday. I did not feel like having it in breakfast. But I did not have much of a choice and hence I would have only Vada. But they used to be so spicy that you cannot avoid bread!! Though Mumbai is an origin for Vada-Pav, I always love them better prepared in Gujarati way. In Maharashtra, they serve with plain pav and dry coconut garlic chutney. Hence it becomes very dry and I literally need juice/water to swallow it. While in Gujarat, they toast the pav with butter and serve with green chutney and garlic chutney.

So far I had always thought to use same vada as in Gujarati Alu vada. But it tasted very different than how vada-pav should be. Then I searched for an online recipe and here is my version and adapted to my taste.

Makes 20 Vada-Pavs
Preparation Time: 30 Minute
Cooking Time: 20 Minute

Ingredients
2 medium-large potatoes
20 pc pav **
1 tsp oil
½ tsp mustard seeds
8-10 curry leaves
½ tsp turmeric powder
Pinch of asafetida
1 tsp sugar
1 tsp lemon juice
¼ tsp garam masala
¼ tsp clove-cinnamon powder
½ tsp red chili powder
½ tsp green chili paste
¼ tsp ginger paste
Salt

For batter,
¼ cup besan
¼ tsp ajwain
Salt

Oil for frying
Butter/oil to toast the pav/bun

** Here we do not get fresh pav easily. So I use dinner rolls or hamburger buns. Even simple bread slice works just fine.

Procedure
1. Boil and mash potato, keep it aside
2. Heat oil in skillet. Add mustard seeds, asafetida, curry leaves, chili paste and turmeric powder. Stir it for a minute and pour this mixture to mashed potato
3. Add remaining spices to potatoes and mix well
4. Divide this mixture into small balls and keep them aside
5. Now in a separate bowl, mix besan, salt and ajwain. Add water and make a thick batter without any lumps
6. Heat oil in a frying pan. Dip each ball in besan batter and deep fry them on low-medium flame until light brown

How to serve,
1. Heat butter on griddle, when melted add garlic chutney (Add grated coconut to this chutey).
2. Toast bun in this mixture
3. Apply green chutney, put vada and cover the bun


Garlic Chutney

I always have this chutney available in my freezer. Bhel Poori, Dabeli, Vada-Pav, Pav-Bhaji, Mysore Masala Dosa or simply Baigan ka Bharta or Dhokla, this chutney is a must have. I always store it in a paste form and whenever required, I take out the paste, add water and chutney is ready! This paste can be preserved for at least couple of months.

Yields ¼ cup paste
Preparation Time: 10 Minute
Cooking Time: NIL

Ingredients
8-10 large cloves of garlic
2 tbsp red chili powder
1 tsp dhaniya powder
1 tsp oil
Salt

Procedure
1. Mix all ingredients and grind into a fine paste
2. Freeze it in air tight container